I used to make my own yogurt all the time. I made it with my homemade soymilk. But I’ve gotten lazy in my old age and have only made it a few times in the last few years– maybe because we finally got Whole Soy yogurt up here in Canada. And then, just when we were enjoying it so much, Whole Soy closed down. So sad! There aren’t that many choices where I live, and the coconut yogurt (which I don’t like) and almond yogurt are just way too expensive for my budget. So, recently I’ve had the urge to make yogurt again, using commercial soymilk instead of homemade (which I do make for drinking and cooking). After all, 2 L of soymilk only costs about $4 Cnd and, even figuring in the cost of the other ingredients, it’s alot cheaper than $5 for 3 cups of Nancy’s soy yogurt!
I wanted a simplified version, with less thickeners than I had used before and without using added soymilk powder, which gives the yogurt a chalky mouth feel and taste. I thought of using raw cashews, which would add rich flavor and mouth feel, as well as their own thickening power. I’m so glad I thought of that– I don’t know why it took me so long!
This yogurt is the creamy kind, which my husband likes best. You could strain it by hanging it in a cheese bag (like this)if you want a thicker, more concentrated yogurt.
Some important info before you start:
NOTE about non-dairy milk: There are many types of non-dairy milk on the market now, but I use soymilk because it is the most nutritious (7 g protein per cup, compared with 1 g in 1 cup of Silk almond milk). I now blend it with some soaked raw cashews to make yogurt for added creaminess, and they add some thickening power, too. (I have not tried this yogurt with other non-dairy milk.)
© Bryanna Clark Grogan 2015
Ingredients
IMPORTANT: Scald all of your utensils with boiling water and set aside.
Pour boiling water over the raw cashews to cover in a heat-proof bowl and let sit for at least 10 minutes. Drain in sieve.
Blend the soaked, drained cashews in the scalded blender jar with 2 cups of the milk from an UN-opened carton (replace cap on the carton until next step), the tapioca starch and agar powder until VERY smooth.
Pour the blended mixture into the batter bowl. microwave on High for 2 minutes. Whisk well and whisk in the remaining milk until thoroughly mixed and smooth. (You can use the immersion blender if you prefer, but don’t let it get too frothy.)
Insert the candy thermometer into the mixture and check the temperature. It will probably be at least over 120 degrees F. You want to get it down to 90-105 degrees F before adding the starter. Cover the bowl loosely with the lid or a clean cloth (not touching the milk mixture). Let it cool down on the counter or in the refrigerator. Check the temperature frequently (washing and scalding the thermometer each time). When the temperature is in the correct range, add the starter and the xanthan or guar gum, whisking with a freshly-washed-and-scalded whisk or immersion blender until smooth. Don’t let it get too frothy.
Pour the mixture into your prepared incubating container(s) [see Tips below about incubating methods] and cover. Incubate for about 7 hours. If you incubate longer and the mixture sort of “rises” and separates a bit, you will have to blend it again and it won’t be as firm, but will be just fine.
Refrigerate overnight and enjoy! Save 1/4 cup for the next batch.
Nutrition Facts
Tips
Either use non-dairy yogurt, such as Nancy’s (in Canada) or Wildwood (in the USA)
OR in the USA:
#1.) You can use 3 wide-mouth quart jars with screw-on lids (the plastic lids, preferably) and place them inside an inexpensive Styrofoam cooler or a camp cooler (clean the inside well!) along with 2 quart jars of boiling water (with lids– and the jar should not touch the yogurt jars). Warm up the cooler with the jars of hot water while you get the yogurt ready. Place the cooler cover firmly in place and cover with an old heavy blanket. You may have to add more hot water to the jars halfway through the incubation time.
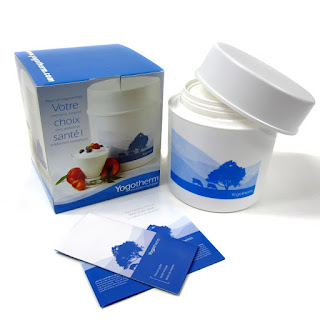
#2.) Use a non-electric yogurt incubator, such as the Yogotherm, which has a 2-quart plastic container nestled in a Styrofoam liner inside of a canister. (I insulate this with blankets on the outside as well.)

 I have an older one, which looks like this– sometimes you can find them in thrift stores.
3.) If you prefer a glass jar, check out the Euro Cuisine 2L Yogurt Maker. They sell a glass jar that fits into the machine in place of the plastic one that comes with it.
#4) Use stainless steel thermos bottles: Almost fill wide-mouth thermos bottles– such as two 32 ounce bottles– with boiling water, cover loosely and let sit for 10 minutes. Pour out the water and add your inoculated yogurt mixture at the right temperature. Secure the lids and wrap the thermoses in two or three terry towels, or a small quilt. Set it in a warm, draft-free place for required time.
+1) Oops! I forgot one— evidently the new Instant Pot, among other things, functions as a yogurt incubator. PS: I’m getting one for Christmas, so I will update if there are any changes needed when made in the Instant Pot.


