Articles

USE-IT-UP TACO-STYLE POTATOES FOR A QUICK PRE-HOLIDAY MEAL

Posted on:


Last week I made a batch of my vegan taco filling from one of my older books (Soyfoods Cooking for a Positive Menopause“) and we had tacos for two days running.  (I had added some coarsely-mashed black beans to the taco filling this time.) I stored the remainder of the filling, Tofu Sour Creme, salsa and shredded lettuce in the refrigerator. A couple of days later, we arrived home late and I contemplated the contents of my refrigerator, and  spied these leftovers. However, I didn’t feel like messing with taco shells this time.  I grabbed some potatoes (locally grown thin-skinned yellow German Butter [Sieglinde] potatoes), scrubbed and poked them with a knife, and microwaved them while I heated the taco filling.

Sieglinde (German Butter) Potatoes

The buttery-tasting potatoes were delicious topped with our taco filling and condiments, and I served a friend’s tasty bean salad (made with his home-grown beans) alongside.

This recipe, by the way, includes my recipe for making homemade red chile paste, which is very easy to make and can be stored in the refrigerator, in a sealed jar, for weeks.  

I love it when we can use up good food in a delicious and creative way!


Printable Copy (of both recipes)

BRYANNA’S EASY VEGAN TACO, TOSTADA, OR BURRITO FILLING
(From my book “Soyfoods Cooking for a Positive Menopause“, slightly revised.)
© Bryanna Clark Grogan 2015
Enough for 12 tacos or tostadas, or 6 burritos.

If you package of taco shells in the pantry, or some tortillas in the refrigerator, this deliciously spicy, kids-of-all-ages-pleasing dinner won’t take long.

Your choice of vegan “burger”:
3 to 31/2 cups firm tofu, which has been frozen at least 48 hours, thawed, squeezed dry and crumbled
OR commercial vegan “hamburger crumbles” 

OR ground seitan 
OR reconstituted granulated textured soy protein (my favorite is So Soya+ Ground Veggie Burger, which is organic and kosher certified) 
OR the crumbs from Soy Curls (or crushed Soy Curls), reconstituted
Additional ingredients:
1/4 c. Bryanna’s Red Chile Paste (see recipe below)
1 large onion, finely chopped
1 T. extra-virgin olive oil

Mix the vegan “burger” of your choice with the Red Chile Paste in a bowl, combining it in well.

In a large heavy skillet, heat the olive oil over medium-high heat, add the onion and sauté until it softens.  Add the “burger”/chile paste mixture and cook over low heat for about 10 minutes, adding a little water if it dries out too much.

Fill the heated taco or tostada shells, or warm soft wheat or corn tortillas– we add shredded lettuce or cabbage, a good spicy tomato salsa, avocado, if we have it, and tofu sour creme.

Cooked pinto or black beans, or vegetarian refried beans, are optional.  You could also add some hashbrown potatoes and/or grated vegan “cheese”, if you like.

BRYANNA’S RED CHILE PASTE
(From my book “Soyfoods Cooking for a Positive Menopause“, slightly revised.)

© Bryanna Clark Grogan 2015
Yield: 1 3/4 cups


1/2 c. good-quality chile powder
7 T. red wine vinegar
2 T. dried red chile pepper flakes
4 vegetarian broth powder or paste (or enough for 4 cups liquid)
1 T. dark sesame oil 
1 T. unbleached flour or 2 tsp. rice flour
1 T. Marmite (or other yeast extract paste) OR 2 T. red miso 

1 T. water
1 T. salt 
6 cloves garlic, peeled
1/2 tsp. dried oregano 
1/2 tsp. ground cumin

Mix all of the ingredients in a food processor until smooth. Store in a sealed jar in the refrigerator.

Enjoy!


The kitchen journal of a vegan food writer…For the 21st
century we need to learn to cook for ourselves again,
and learning to cook vegan can be a bit intimidating.
I’d like to help with that, from my kitchen to yours.

Bryanna Clark Grogan, author of 8 published vegan cookbooks and The Vegan Feast quarterly cooking newsletter. Moderator of the beginners’ vegetarian forum on vegsource.com.

Articles

MY NEW, EASY VEGAN YOGURT

Posted on:

I used to make my own yogurt all the time.  I made it with my homemade soymilk.  But I’ve gotten lazy in my old age and have only made it a few times in the last few years– maybe because we finally got Whole Soy yogurt up here in Canada.  And then, just when we were enjoying it so much, Whole Soy closed down.  So sad!  There aren’t that many choices where I live, and the coconut yogurt (which I don’t like) and almond yogurt are just way too expensive for my budget. So, recently I’ve had the urge to make yogurt again, using commercial soymilk instead of homemade (which I do make for drinking and cooking).  After all, 2 L of soymilk only costs about $4 Cnd and, even figuring in the cost of the other ingredients, it’s alot cheaper than $5 for 3 cups of Nancy’s soy yogurt! 

I wanted a simplified version, with less thickeners than I had used before and without using added soymilk powder, which gives the yogurt a chalky mouth feel and taste.  I thought of using raw cashews, which would add rich flavor and mouth feel, as well as their own thickening power. I’m so glad I thought of that– I don’t know why it took me so long!


This yogurt is the creamy kind, which my husband likes best.  You could strain it by hanging it in a cheese bag (like this)if you want a thicker, more concentrated yogurt.


Some important info before you start:

NOTE about non-dairy milk: There are many types of non-dairy milk on the market now, but I use soymilk because it is the most nutritious (7 g protein per cup, compared with 1 g in 1 cup of Silk almond milk). I now blend it with some soaked raw cashews to make yogurt for added creaminess, and they add some thickening power, too. (I have not tried this yogurt with other non-dairy milk.)


I use what is usually called “Original”, NOT Unsweetened, soymilk. I know that many people balk at the fact that “Original” contains sugar, but that is because dairy milk naturally contains sugar, and if you don’t add a little it doesn’t taste like milk. To give you some perspective, there twice as much sugar (12 g) in 1 cup dairy milk than in Silk Organic Original Soy Milk (6g).

Sodium content: 1 cup Silk “Original” contains about 105mg sodium and 1 cup of various types of cow’s milk contain between 98 and 103mg sodium. (Silk almond contains 160 mg sodium.)

Equipment:
You will need a blender, a fine sieve, a 2L microwave-safe batter bowl/pitcher (see photos below for the ones I have– one is Pyrex and one is stoneware), a medium whisk, a microwave large enough for a 2L batter bowl, a slim spatula, a stick/immersion blender, a candy thermometer, measuring utensils, an incubation set-up (see Tips below). EVERYTHING needs to be scalded with boiling water before use!

Stoneware and Pyrex batter bowls:

So, here’s the new recipe:


BRYANNA’S EASY NEW HOMEMADE SOY/CASHEW YOGURT

© Bryanna Clark Grogan 2015

Servings: 18
Yield: 9 cups

Ingredients
1/2 cup raw cashews
2 Litres (8 1/2 cups) Original (NOT unsweetened!) Silk Organic Soymilk from UN-opened carton (use 2 quarts if you are in the USA– it will just be a little less yield) (OR your favorite non-dairy milk, but I have not tried any others) 
(See Note above about unsweetened vs original)
2 Tbsp tapioca starch (or tapioca flour– it’s the same thing)
1 tsp agar powder
1/4 cup cultured soy yogurt for a starter, or about 2 tsp. dairy-free powdered live yogurt starter/culture (see Tips below)
1/2 tsp xanthan gum or guar gum


IMPORTANT: Scald all of your utensils with boiling water and set aside.

Pour boiling water over the raw cashews to cover in a heat-proof bowl and let sit for at least 10 minutes. Drain in sieve.

Blend the soaked, drained cashews in the scalded blender jar with 2 cups of the milk from an UN-opened carton (replace cap on the carton until next step), the tapioca starch and agar powder until VERY smooth.

Pour the blended mixture into the batter bowl. microwave on High for 2 minutes. Whisk well and whisk in the remaining milk until thoroughly mixed and smooth. (You can use the immersion blender if you prefer, but don’t let it get too frothy.)

Insert the candy thermometer into the mixture and check the temperature. It will probably be at least over 120 degrees F. You want to get it down to 90-105 degrees F before adding the starter. Cover the bowl loosely with the lid or a clean cloth (not touching the milk mixture). Let it cool down on the counter or in the refrigerator. Check the temperature frequently (washing and scalding the thermometer each time). When the temperature is in the correct range, add the starter and the xanthan or guar gum, whisking with a freshly-washed-and-scalded whisk or immersion blender until smooth. Don’t let it get too frothy.

Pour the mixture into your prepared incubating container(s) [see Tips below about incubating methods] and cover. Incubate for about 7 hours. If you incubate longer and the mixture sort of “rises” and separates a bit, you will have to blend it again and it won’t be as firm, but will be just fine.

Refrigerate overnight and enjoy! Save 1/4 cup for the next batch.

Nutrition Facts
Nutrition (per 1/2-cup serving): 76 calories, 40 calories from fat, 3.7g total fat, 0mg cholesterol, 48.5mg sodium, 184.1mg potassium, 6.5g carbohydrates, 1.2g fiber, 3.2g sugar, 4.1g protein.

Tips
NON-DAIRY YOGURT STARTER:

Either use non-dairy yogurt, such as Nancy’s (in Canada) or Wildwood (in the USA) 
OR

OR in the USA:
and

FOUR WAYS [+1] TO INCUBATE YOUR YOGURT:

#1.) You can use 3 wide-mouth quart jars with screw-on lids (the plastic lids, preferably) and place them inside an inexpensive Styrofoam cooler or a camp cooler (clean the inside well!) along with 2 quart jars of boiling water (with lids– and the jar should not touch the yogurt jars). Warm up the cooler with the jars of hot water while you get the yogurt ready. Place the cooler cover firmly in place and cover with an old heavy blanket. You may have to add more hot water to the jars halfway through the incubation time.


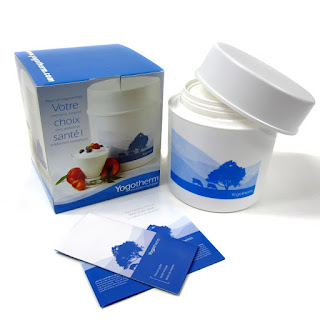
#2.) Use a non-electric yogurt incubator, such as the Yogotherm, which has a 2-quart plastic container nestled in a Styrofoam liner inside of a canister. (I insulate this with blankets on the outside as well.)

 I have an older one, which looks like this– sometimes you can find them in thrift stores.

3.) If you prefer a glass jar, check out the Euro Cuisine 2L Yogurt Maker. They sell a glass jar that fits into the machine in place of the plastic one that comes with it.

#4) Use stainless steel thermos bottles: Almost fill wide-mouth thermos bottles– such as two 32 ounce bottles– with boiling water, cover loosely and let sit for 10 minutes.  Pour out the water and add your inoculated yogurt mixture at the right temperature.  Secure the lids and wrap the thermoses in two or three terry towels, or a small quilt. Set it in a warm, draft-free place for required time.

+1) Oops! I forgot one— evidently the new Instant Pot, among other things, functions as a yogurt incubator. PS: I’m getting one for Christmas, so I will update if there are any changes needed when made in the Instant Pot.


Enjoy!

The kitchen journal of a vegan food writer…For the 21st
century we need to learn to cook for ourselves again,
and learning to cook vegan can be a bit intimidating.
I’d like to help with that, from my kitchen to yours.

Bryanna Clark Grogan, author of 8 published vegan cookbooks and The Vegan Feast quarterly cooking newsletter. Moderator of the beginners’ vegetarian forum on vegsource.com.

Articles

VEGAN ONE-POT PASTA WITH BROCCOLI, SPICY SAUSAGE & SOY CURLS

Posted on:

Another “quickie” recipe this week!  We’re eating pretty simply these days.  But, since many of you are preparing for the delights and excesses of American Thanksgiving, I thought it would be good to share this recipe I threw together a couple of nights ago.  You might want something like this in the days leading up to the feast, or afterwards when you, too, are wishing for a little simplicity!

I love one-pot pasta meals– not much fuss or and very little time, but, with the right mix of ingredients, plenty of flavor and substance!

I have 3 more one-pot pasta recipes on my blog:

One-Pot Cheesey Farfalle (Bowtie Pasta) with Asparagus & Soy Curls  


My version of Martha Stewart’s One-Pan Pasta

One-Pot Vegan Pastalaya (Jambalaya’s Cousin)

Printable Recipe

BRYANNA’S VEGAN ONE-POT PASTA WITH BROCCOLI, SPICY SAUSAGE & SOY CURLS
Servings: 6

1 Field Roast Chipotle Vegan sausage (or your favorite), sliced and crumbled a bit
4 ounces  dry Soy Curls, reconstituted in 2 cups hot “chicken-y” vegan broth and drained
(or, you can use about 2 cups of any other vegan chicken sub strips)
2 cloves garlic, chopped
4 cups good-tasting “chicken-y” vegan broth (I like Better Than Bouillon No-Chicken Vegan Broth Base)
3 cups dry spiral macaroni (cavatappi) or similar pasta
1 lb. broccoli florets, cut into smallish pieces
2  Tbs lemon juice 
2 Tbs rich nutmilk or unsweetened vegan creamer (such as So Delicious Original Coconut Creamer)
1 ounce (about 1/2 cup) vegan parmesan sub (I like Go Veggie!) 
Salt and pepper to taste

Mix the drained Soy Curls, garlic and crumbled sausage together and place on a lightly-oiled baking sheet (rimmed).  Place about 4″ under your oven’s broiler and broil on high (watching often) until it starts to brown a bit.  Mix and turn and broil again until the mixture is lightly browned. Remove from the oven and scoop into a large pot. (NOTE:  If you prefer, you can saute the ingredients in a tablespoon or two of olive oil right in the pot.  I like to broil ingredients in order to brown without anything but a few sprays of oil.)

Cavatappi pasta

Add the broth to the pot and bring to a boil.  Add the pasta and adjust the heat to a good simmer.  Cook for 9 minutes, stirring now and then.  Add the broccoli and cook for about 3 minutes more, or until the broccoli is cooked to crisp-tender.

Stir in the lemon juice & creamer or nut milk, along with the vegan parmesan sub.  Stir well and taste for salt and pepper.

Serve immediately.

Nutrition Facts
Nutrition (per serving): 377 calories, 52 calories from fat, 5.8g total fat, 0mg cholesterol, 582.6mg sodium, 341.1mg potassium, 54.1g carbohydrates, 4g fiber, 2.1g sugar, 23.4g protein.

Enjoy!

The kitchen journal of a vegan food writer…For the 21st
century we need to learn to cook for ourselves again,
and learning to cook vegan can be a bit intimidating.
I’d like to help with that, from my kitchen to yours.

Bryanna Clark Grogan, author of 8 published vegan cookbooks and The Vegan Feast quarterly cooking newsletter. Moderator of the beginners’ vegetarian forum on vegsource.com.
Articles

LUSCIOUS 6-INGREDIENT LEEK & MUSHROOM SOUP

Posted on:

I’m sorry for not posting for so long… I’ve been fighting a bad cold and thanks heavens it’s almost gone, because now I’m getting ready for some very welcome house guests!.

I haven’t been that interested in cooking while I’ve been sick, but soup is always good, especially when the weather is dreary.  The day before yesterday I was tryig to think of a simple soup to make, perusing the contents of my refrigerator for ideas, when I spied a rather large leek that needed tobe used, and a bag of cremini mushrooms that were starting to get a bit sad looking, but still usable.  I like both leeks and mushrooms very much, so I thought I would combine them.

I want to keep it simple and have a slightly “chunky” soup with some creaminess without making an actually creamed (puréed) soup.  I wanted to add a bit of white bean flour to add a little nutrition as well as to thicken the broth. (Two earlier posts about using white bean flour: here and here.)

This is what I came up with and the results were pretty amazing– this soup is an explosion of flavor, despite the few ingredients, quick cooking, and ease of preparation.

Printable Recipe
BRYANNA’S LUSCIOUS 6-INGREDIENT LEEK & MUSHROOM SOUP
Servings: 4

1 large leek, white and green part, cleaned
14 ounces cremini mushrooms
2 Tbs vegan butter (or olive oil) (here’s my homemade palm oil-free vegan “Buttah”)
1/4 cup white vermouth (or dry white wine)
4 cups rich-tasting “chickeny” vegan broth (I like Better Than Bouillon No-Chicken Vegan Broth Paste)
1/4 cup white bean flour
Optional Garnish:
Non-dairy yogurt, whisked
smoked paprika
parsley

Cut the leek across in half, then slice the halves lengthwise in half and then in half again.  Thinly slice the lengths of leek across into little slices. Set aside.

Clean and thinly slice the mushrooms and set aside.

Melt the vegan butter in a heavy pot over medium-high heat.  Add the leeks and sauté for about 5 minutes.

Add the mushroom slices and sauté with the leeks for about 5 minutes more.

Add the vermouth and boil for 1 minute.  Add the broth and simmer for 15 minutes.

Ladle about 2 cups of the soup (broth and solids) into a blender and add the white bean flour.  With the middle cap removed from the blender lid (to prevent the steam from making the hot mixture explode all over the place!), place the lid in place on the blender container and cover the hole loosely with a folded tea towel.  Blend until smooth.

Scrape the blended mixture back into the soup and simmer for 5 minutes more.

Serve the soup plain, or drizzle it with a bit of non-dairy yogurt (whisked to make it pourable) and sprinkle with a bit of smoked paprika.

Nutrition Facts
Nutrition (per serving): 133 calories, 61 calories from fat, 6.9g total fat, 0mg cholesterol, 701.3mg sodium, 496.5mg potassium, 13.3g carbohydrates, 3g fiber, 4.1g sugar, 5.6g protein.

Enjoy!

The kitchen journal of a vegan food writer…For the 21st
century we need to learn to cook for ourselves again,
and learning to cook vegan can be a bit intimidating.
I’d like to help with that, from my kitchen to yours.

Bryanna Clark Grogan, author of 8 published vegan cookbooks and The Vegan Feast quarterly cooking newsletter. Moderator of the beginners’ vegetarian forum on vegsource.com.

Articles

SPICY VEGAN BASQUE CHICKPEA & SAUSAGE STEW

Posted on:


About 3 years ago we discovered that one side of my father’s family might have Basque roots in Spain.  That, of course, made me curious about Spanish Basque culture and cuisine.  The cuisine is quite meat-heavy, but many dishes can be made vegan. One category of dishes that Basques are well known for is their delicious bean stews. (I posted one with red beans a few years ago.)

The following vegan version of another common Basque bean stew based on chickpeas is from my book World Vegan Feast“.  Since I always keep a good store of home-cooked beans (including chickpeas) and some Field Roast Chipotle sausages, in my freezer, this satisfying stew is one of my go-to dishes for a quick, easy and delicious dinner.


Printable Recipe


BRYANNA’S SPICY VEGAN BASQUE CHICKPEA & SAUSAGE STEW 
Serves 4
There are many versions of this common Basque bean stew– this one, thick with vegetables and spicy vegan sausages, is super-simple and super-delicious. The recipe is easily doubled.

**This recipe, slightly altered, is from my book World Vegan Feast.**

8 ounces dried chickpeas, picked over, rinsed and drained and soaked overnight in plenty of water
OR USE 3 1/4 cups drained cooked or canned chickpeas (If you use these, omit the first step in the recipe.)
1 tablespoon olive oil
1 small onion, chopped
1 small green bell pepper, cut into 1/2-inch dice
1 small red bell pepper, cut into 1/2-inch dice
1 medium carrot, scrubbed and cut into 1/4-inch-thick rounds
4 to 6 ounces vegan chorizo or spicy vegan sausage (such as Field Roast Chipotle, which is very spicy) coarsely crumbled or sliced diagonally into 1/4-inch thin rounds
1 (14-ounce) can plum tomatoes, with juice
1/2 to 1 cup vegan broth (depending on how “soupy” you prefer the stew)
salt to taste

1.) Drain the soaked chickpeas and put in a medium pot with water to cover, with 2 to 3 inches water above the beans. Simmer for 2 hours or until the chickpeas are tender. Drain them and set aside.  (Omit this step if you use cooked or canned chickpeas.)

2.) Use the same pot to heat the olive oil over medium-high heat. Add the onions, bell peppers and carrot and sauté until the onion starts to brown. Add the chorizo or sausage and brown it a bit. Add the tomatoes and juice, crushing the tomatoes a bit. Add the broth and bring the stew to a boil. Reduce the heat to a simmer and cook, covered, for about 30 minutes. Taste for salt and serve with crusty bread, or, though it’s not as authentic, you could substitute steamed rice or cornbread to soak up the juices.

Enjoy!

The kitchen journal of a vegan food writer…For the 21st
century we need to learn to cook for ourselves again,
and learning to cook vegan can be a bit intimidating.
I’d like to help with that, from my kitchen to yours.

Bryanna Clark Grogan, author of 8 published vegan cookbooks and The Vegan Feast quarterly cooking newsletter. Moderator of the beginners’ vegetarian forum on vegsource.com.