Meet our Herbie of the Week: Elicia!Elicia struggled with her weight since childhood, but it wasn’t until she realized her health was keeping her from living a full life with her children that she decided to make a serious change.Now that she’s plant-b…
Articles
Posted on:


Save the Dish: 6 Common Cooking Mistakes — Solved! – Cook Like a Pro Series [6/6]
You went to all that trouble to cook… and then it didn’t turn out right…
GAH!
But you CAN save it (unless you burnt it to a crisp… there’s no coming back from that…)
TOO SALTY
If the saltiness is the result of an over-reduced soup, add water. Another option is to add acid, such as lemon juice, to cut the salt. Depending on the dish, adding wine might also work.

The best way to avoid over-salting is to cook without salt and only add it at the end after you’ve tasted your dish.
ESPECIALLY if you’re using any kind of canned item. Most canned goods and condiments contain salt (buy no salt and low-sodium as much as possible).
TOO SOGGY
Spread waterlogged grains on a baking sheet and refrigerate.
They should be a little dryer and less soggy the next day. (FYI–You probably still won’t want to use the overcooked grains as a side dish, but IN something, like a soup or stir-fry, they’ll be okay).
You can also make pudding from your overcooked grains as another alternative.
FYI–Soggy rice or quinoa happens when you add too much liquid.
(See this post on grains to know the correct grain to water ratios)
If you overcook your chickpeas (guilty!) put them on a baking sheet and bake — then you have roasted chickpeas which are delicious on their own, or you can make roasted chickpea hummus.

Hummus and other bean dips are an AWESOME way to save any overcooked beans, btw — but if it’s really wet, you might want to bake for a bit to dehydrate a little or your dip will be pretty bland.
TOO MUSHY
Mushy vegetables? Puree into a soup.
Mushy “meat” loaf? Remove from pan and mold into patties with your hand. Serve as is or place on a baking sheet and bake another 5-10 minutes for a crisper outside.
TOO LUMPY
Gravy has lumps? Strain it (use a chinoise strainer) but this only works with thinner, more homogenous sauces – if it’s a chunky or mushroom gravy it won’t work.
Lumps happen when added your ingredients too quickly (slow and steady… whisk, whisk, whisk) or at incorrect temperatures. For example, you can’t whisk cornstarch into hot liquid, it has to be blended into a cold or room temp liquid first, then add that to the hot dish. Make a “slurry” first!
TOO BLAND
A good place to start is with the basics: salt and pepper. Next try ramping up the spices you already used, or add a dash of a prepared seasoning like Italian herb, taco seasoning, Cajun seasoning, Mrs. Dash Chipotle, whatever would be complementary to the ingredients.
I’ve also had a lot of luck with these flavors as a one-off addition: mustard, ketchup, smoked paprika, nutritional yeast, curry powder, and PINEAPPLE.
Pineapple can save most dishes — keep a can or some frozen on hand.
Citrus like lemon, lime, and orange, can also go a long way in improving a dish.
… and then there’s always HOT SAUCE FOR THE WIN.

TOO HOT
Mouth on fire? Feeling the burn? Extinguish the heat in one of five ways:
(1) Add an acid such as lemon or lime juice. Pineapple and tomato sauce might also work — just think about what might be complementary to the ingredients and flavors presented.
(2) Add potatoes or carrots. Both can temper the heat, especially when they’re shredded.
(3) Almond butter or peanut butter can mellow out the heat (and they go with most flavors!) A little bit goes a long way. If you can’t have nuts, tahini would also work.
(4) Sweeten it! A pinch of sugar, a few drops of honey (or agave) or even a squirt of ketchup can often do the trick.
(5) Get creamy! Non-dairy milks and yogurts (plus blended silken tofu) can mellow really hot foods.
What are some of your SOS-save the dish secrets and tips?
Articles
Posted on:


How to Chop + Prep Vegetables Quickly – Cook Like a Pro Series [2/6]
Are you ready, Ninja?!
You can prep all this:

IN LESS THAN 2.5 MINUTES.
(I’ll show you how)
It’s GO time Herbies!
Don’t chop like a chump 😉
Chopping your veggies can be easy and painless — it all starts with holding the knife correctly.

RULE #1: Make sure you’re holding your knife right… BY THE BLADE.
Start by pinching the blade where it connects to the handle with your thumb and index finger. Some chefs pinch with the middle finger, too. {Either way works.}
Your other fingers slip up behind the vertical part of the blade that connects to the handle, then lightly wrap around the handle.
YOUR GRIP IS ON THE BLADE. The rest is just for support.
Don’t grip too tightly (it creates tension) be nice and loose — cooking is a casual but intimate relationship. You wouldn’t death grip a lover’s hand would you? 😉
Mincing Garlic (20 seconds)
Use the blade of your knife to flatten your garlic clove. Then chop slices, and mince.
Also check out this video on how to peel an entire head of garlic in less than 10 seconds.
Dicing Onion (1 minute)
The natural rings of the onion make dicing onions easy and effortless.
Chopping Carrots (20 seconds)
I have two favorite ways to slice carrots. In “rounds” is the easiest, but the diagnoal looks a bit prettier and also cooks faster.
Slicing Bell Peppers (40 seconds)
I just picked up this great new roll-and-flow technique! SO FAST!
Lettuce (3 seconds)
Saveur has a great tip for removing the hard core in lettuce…smash it.
Practice makes perfect.
Quick chopping is mostly about comfort. Once you’re comfortable with your knife, you’ll quickly master your skill and increase your speed.
There are other hacks and techniques, but it really comes down to your comfort.
Batch cooking has done wonders for my knife skills.
For the past two years I’ve been cooking the majority of our meals ahead on Sunday. Using the meal plans it takes me 1-2 hours. (You catch watch me cook 7 meals in 1 hour here.)
All that prep forces me to chop, chop, chop — over and over.
It’s a little like your own self-imposed, mini culinary school and Top Chef quickfire challenge.
The more you do it, the better you’ll be.
Buying pre-minced garlic and chopped vegetables is always an option, though a more expensive one. (I also think pre-minced garlic is inferior in terms of taste) and you can buy all kinds of gizmos like a food processor ($126), a mini food processor ($39), a garlic press ($9.52), or an onion wizard ($19.48).
but I find I’m much faster by hand (and it involves a lot less cleanup)
It was well worth the learning curve for me — and learning how to hold my knife (and buying a good knife) was the real game changer.
If you practice regularly (say once a week batch cooking for an hour or so) you’ll be a Ninja within 6 weeks — maybe less.
Don’t Chop Like a Chump 😉
Articles
Posted on:


Herbies of the Week: Wendy (She’s Lost 30lbs & Her Family’s Health is Better Than Ever!)
Meet our Herbie of the Week: Wendy!
Wendy made the decision to go plant-based one month after completing an aggressive chemo/radiation treatment for her Stage 2 Non-Hodgkins Lymphoma.
After making the switch, her surgeon was amazed at how quickly she was able to recover from surgery and her oncologist is always asking her how she lost 30lbs.
But that’s not all! Her husband and two kids have experienced some amazing benefits since going plant-based as well!
Read on for Wendy’s inspirational story!

My husband always jokes that he is usually two years behind me when it comes to most of my big ideas. Translation: I suggest something and it takes about two years for me to ease him into the idea before he catches on fully. Ironically, I had made the suggestion that we give up meat and dairy years ago, since our oldest son had been dairy-free most of his life already. (Our 14 year-old is on the autism spectrum. We learned early on that diet impacted his presentation of autistic behaviors significantly, so after much research, we decided to remove all dairy and gluten from his diet. Jack made fantastic strides in his therapies and our case manager and pediatrician couldn’t get over how quickly he had responded to changes in his diet! We eventually re-introduced gluten and dairy, but we had always limited the amount of both in his daily diet.)
As a family, we had made conscious choices to eat more locally-sourced meat and dairy products. We tried to buy organic produce off of the “Dirty Dozen” list and grew some of our own fruits and vegetables. I had even given up using traditional antiperspirant and body care products containing parabens. I was an avid jogger and had even completed a few sprint triathlons. Still, in spite of all my efforts, I had never been able to lose the extra weight gained after my two children were born (now 14 and 10). By most people’s standards, I was doing everything right, yet I was chronically plagued by extra body weight (50+ lbs) and bouts of depression.
In October of 2013, I was diagnosed with Stage 2 Non-Hodgkins Lymphoma. I had a number of lymph nodes removed (one the size of a walnut) and began an aggressive chemo/radiation schedule. To combat many of the symptoms/reactions to the chemotherapy drugs, I was prescribed steroids and other drugs that wreaked havoc on my system. (Previously, I rarely even took a Tylenol!)

A month after completing treatment, I saw the movie “Forks Over Knives.” Half-way through the film, I called my husband into to the room to watch it with me! When the movie was finished, we both looked at each other and implicitly knew what we should do. Both of his parents are diabetic, and both have genetically high blood pressure. Almost all of our grandparents were diabetic, every one of them had heart disease. The joke in my family is that all of the men have open-heart surgery before turning 50 and my father was no exception, undergoing a triple bypass in his 40s. My father’s perspective on open-heart surgery is one of the reasons why I love the quote from Dr. Esselstyn regarding the drastic nature of a plant-based diet as compared to the drastic nature of open-heart surgery.
The next day, we went plant-based. Alan and I agreed that this was not a matter of perfection, but rather a decision for our own better health. There was no room for all-or-nothing thinking. We agreed that if we were going to eat meat or dairy, it needed to be a high quality exception! We weren’t going to “fall off the wagon” so to speak, for the sake of a McDonald’s hamburger!! In recognition of our role in the family as the holiday hosts, we knew we would have to prepare turkey for Thanksgiving or Ham at Easter, but we could consciously choose to not have any and instead prepare multiple plant-based options for everyone to try. Luckily, our boys weren’t picky eaters and had always eaten veggies and plants at mealtime so we didn’t have to wonder what they would eat, but we did know that there were times when they’d want the pepperoni pizza! Progress, not perfection…indeed!
My first HH recipe was the Apple Crisp Muffins. My younger son loves to be in the kitchen with me and he rejoiced over the lack of eggs, so he could lick the spoon!!! We had just moved into a new home and when my husband came home for lunch on a chilly fall afternoon and smelled the cinnamon and apples, he was blissful! My son beamed that he had helped make the muffins! Over the next few weeks, I purchased several of the meal plans to help stay on track during the move and with our busy sports/school schedules while still figuring out the nutritional aspects of plant-based eating while training for my first half-marathon. Last October, 1 year to the day of my cancer diagnosis, I ran my first half-marathon. This weekend, I will run my second!
My sons just had their annual physicals and my pediatrician affirmed our choices saying, “they are happy, healthy boys and their BMIs are “ideal.” My oncologist always asks me what my secret is for losing the weight finally, and my answer is always the same, it’s the plant-based diet! I have lost over 30lbs and 4 clothes sizes since going plant-based, and recently had a total health screening. My “numbers” were “perfect” according to my oncologist! All of my numbers have improved, even as compared to the years before my lymphoma diagnosis. My husband has also lost weight and his numbers, including his borderline high cholesterol, have improved significantly since going plant-based. These short-term achievements are fun to report, but we are so optimistic about what this means for our future health, as well!

When other people ask me why I maintain this lifestyle, I always remark that I simply feel like my engine runs better on plants. It’s true! I don’t feel sluggish after meals, I feel like I recover faster after my workouts and that my body can convert the food that I eat into energy I can use, much quicker than on a traditional diet. Moreover, my surgeon couldn’t believe how quickly my body healed from a minor surgical procedure related to my cancer treatment. He actually called another nurse into the room to photograph my recovery because they couldn’t believe I could heal so quickly, almost 2 weeks ahead of the recovery schedule they usually used!
For so long, our families thought we were crazy! They rolled their eyes when they opened our refrigerator and didn’t find a gallon of milk. The never-ending sarcasm about our “vegan” diet and the criticism that we were harming our children by not feeding them cow’s milk, at times, seemed too much to handle. Yet only a year later, my sister-in-law was calling to know what milk substitutes we used (My niece had stayed with us for a week and her “chronic” constipation that she takes prescription medication to treat, cleared up! She was unusually regular while staying with us and told her mom she didn’t want to drink milk anymore because SHE thought it made her constipation worse!) Friends ask me for recipes all of the time now and my mother brags about her “vegan” daughter and how healthy she is to all of her friends.
I tell people that I could not have made it this far without Lindsay’s books and meal plans. She made it so easy to get breakfast, lunch and dinner made and the recipes are always a hit with my boys! We can’t live without HH Light & Lean, Tofu Scramble (with mixed veggies) and Meatloaf Bites, the Smoky Split Pea Soup (from the meal plans) when the weather gets cold (always impresses company, too), and how do you begin to thank someone for introducing you to nutritional yeast?!?!?!
Thank you Wendy for sharing your amazing story with us!
Articles
Posted on:


Metal, Glass, Ceramic, or Silicone Pans: When To Use Each (The Essential Cookware Guide) Cook Like a Pro Series [1/6]
Kitchen flop?
It’s probably your cookware.
(No really! It’s NOT you!)
I know a lot of you have trouble with your “meat” loaves firming…
DO NOT USE GLASS.
Only metal pans 🙂
Except for casseroles like lasagna, you don’t want to use glass for baking.
Not banana breads, “meat” loaves, or anything you expect to firm or brown/crisp.
When I posted this tip (and meme) on Facebook, it was a game changer for everyone who had a previous fail.
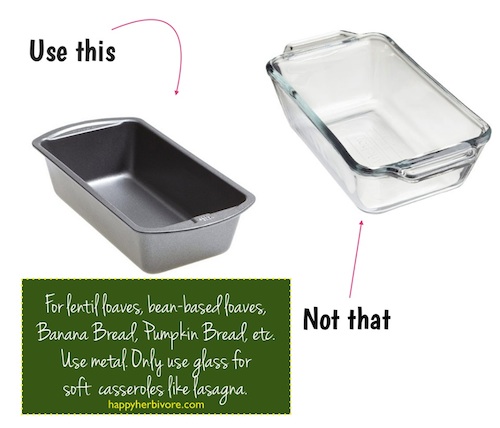
RULE: Glass bakeware is for “wet” baked goods (like lasagna, casseroles, bread puddings and cobbler) and metal bakeware is for “dry” baked goods (like cookies, breads, muffins, and lentil loaves).
If you’re worried about non-stick safety, here’s an article by Dr. McDougall discussing the science for your consideration: “Non-stick Pots and Pans: Are They Safe?“
Can you interchange glass and metal?
Generally no. If a recipe calls for one over the other — use what is specified. If the recipe doesn’t indicate glass vs. metal, use this guide to decide.
(Hey that rhymed!)
Lingo: “Baking pan” usually means metal vs “baking dish” usually means glass.
If it’s a HH recipe, you want to use metal – with a few limited exceptions.
Glass Pans
I donated all my glass bakeware about a year after we were plant-based, realizing I never used it anymore.
(Especially after I discovered the ease of lasagna rolls. Lasagna was the only thing I still used my glass bakeware for).
The one exception is my Pyrex glass pie dish that I use to make HH cornbread and HH cobbler (though my metal pie pan works just as well for both), and HH Pumpkin Pie.
There’s been a long debate in the culinary world on metal vs. glass when it comes to pies, and I have used both, though I like glass better since I’m baking oil-free. (I find my pies don’t “stick” to glass but they sometimes stick to metal).
Glass conducts heat extremely well (and it’s an insulator), which is why food cooked in glass often burns at the edges before cooking all the way through (hence the “meat” loaf dilemma). It also takes longer to heat up.
If you must use glass, reduce oven temp by 25 degrees and add 5-10 minutes on your bake time — though be prepared it still might not be “perfect.”
I also recently upgraded all my storage containers to glass, and since they are oven-safe, I have glass bakeware if I ever want it for, say, HH Enchilada Casserole (from The Happy Herbivore Cookbook).
Metal Pans
Light-colored and shiny metal pans are best IMHO. Darker metals cause over-browning and burning since non-shiny metal pans absorb heat faster.
I got rid of my cast iron skillet when I went oil-free, but the only time I liked it for baking was when I made cornbread so I could get that deep, golden-brown crust!
HOWEVER, as I learned writing Everyday Happy Herbivore, shoving your metal pan in the oven to heat it BEFORE adding the batter does about the same.
Aluminum is better than stainless steels for conducting heat and baking foods evenly.
Metal also heats fast (and cools fast too) so it’s IDEAL for short baking time items at really high temps like HH Whole-Wheat Drop Biscuits and HH Oven Fries.

RULE: Don’t store/leave food in aluminum pans. The aluminum will react with acids in the food and give leftovers a metallic taste. (Stainless steel does not do this).
Stoneware
Two years ago I bought my first stoneware piece.
I was cheap and bought a knockoff and if I could do it over I would save to purchase Le Creuset instead.
I don’t use my stone bakeware piece very much — mostly for HH Spinach & Artichoke Dip (in Light & Lean and Holidays) or stuffing (it looks pretty on the table at parties and potlucks).
I’ve also been debating on buying a 5.5 qt Dutch Oven for about 9 years.
The hold up is that they’re expensive, and I’m not sure I’d get as much out of it as I might if I was an omnivore (it seems they’re more popular with meat dishes, which is lost on me).
Silicone
I’ve had mixed results with silicone, but it is the fat-free, oil-free, no-stick bestie.
Sometimes my silicone cups work (though I find they need a few more minutes baking), and sometimes my goodies are mush in the middle no matter what.
Silicone is a poor heat-conductor and baked goods brown very little, if at all.
Which brings me to my next point:
Sometimes the slicone mat works great for me, but most often whatever side was ON the mat is kinda wet and not as crisp as the other sides, even if I flip halfway (vs. when I cook using parchment paper, it’s always perfect).
You can also get parchment paper liners, which I LOVE.
I freakin’ LOVE parchment paper. I just wanna wrap myself in it…
ON THAT NOTE, wax paper is NOT the same as parchment paper.
This will happen if you use wax (no bueno)
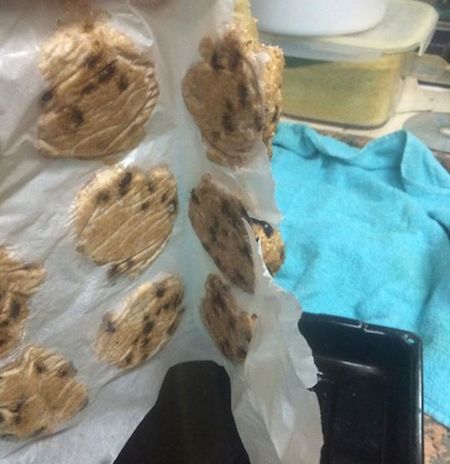
I try to create as little waste as possible, so I will reuse my parchment paper sheets several times over AND I only use the cups when serving friends or taking to a potluck. At home I cook them “naked” in my muffin tin.
At home I’ll also use silicone if it’s just Scott and I eating, since I know he will eat something not perfect and so will I.
AAAAND because I get a bazillion questions about what I use *exactly*
Here goes:
Note: Most of these items I bought a decade ago and they still look new.
My Knife – Wusthof Classic 7-Inch Santoku Knife
Cheaper Knife – Victorinox 10-Inch Chef’s Knife
Cookware – Emeril Stainless Steel Cookware Set
Non-Stick Skillet – Calphalon Nonstick 10 and 12-Inch Pans
Food Processor – Cuisinart 9-Cup Food Processor
Mini Food Processor – Cuisinart 3-Cup Mini Food Processor
Rice Cooker – Panasonic 5-Cup Rice Cooker
Cutting Boards – Bamboo Cutting Board Set
Mixing Bowls, etc – Joseph Joseph Compact Mixing Bowl, Food Prep & Measuring Set
Loaf Pans – Good Cook 8 Inch x 4 Inch Metal Loaf Pan
Food Storage – Glasslock 18-Piece Assorted Oven Safe Container Set
Pressure Cookers – Read this blog post comparing the Instapot to the Cuisinart pressure cooker.
P.S. Welcome to the “Cook Like a Pro” mini series!!!
This series will span across 6 posts this month PLUS additional BONUS content in the FREE Happy Herbivore newsletter each week.
Don’t miss the free tutorial videos and PDFs!
and if YOU have any cookware tips or insights, please leave a comment!